Intraoperative TEE Basics
Resources
Practical Approach to Transesophageal Echocardiography 4th edition by Scott Reeves and Albert Perrino Jr.
Ultrasound Physics
The basics of ultrasound:
- Sound waves vibrating off of structures travelling through a media
- 2-10Mhz (Human hearing < 20,000hz)
- Electrodes stimulate ceramic pizoelectric crystals which both vibrate and receive incoming vibrations.
- Electricity causes trapped polarized molecules to vibrate
- Better resolution with increased frequency
- Ultrasound produces reflection, scatter, and refraction which can alter your image or fool you into thinking something is present when it actually is not.
- Image gets worse with increased distance from the probe and the structure: dispersion
- Heat is the absorption of the ultrasound waves and with enough time can cause burns
TEE in the OR
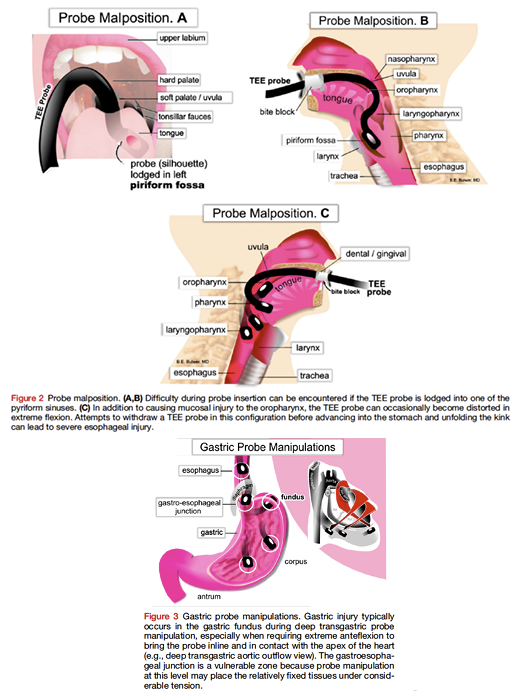
Complications of TEE
- Oropharyngeal: lips, teeth, gum damage, laceration, perforation, tracheal intubation
- Esophageal: Odynophagia, dysphagia laceration, perforation
- Gastric: Laceration, perforation
- Misc: Airway compromise, thermal injury, tongue necrosis
Absolute Contradindications of TEE
- Perforated viscous
- Esophageal pathology
- Active GI bleed
- Recent upper GI surgery
- Esophagectomy or gastric bypass surgery
Relative Contradindications of TEE
- Atlantoaxial joint disease
- Severe cervical arthritis
- Chest radiation
- Hiatal hernia
- GI surgery history
- Recent GI bleed
- Dysphagia or peptic ulcer history
- Coagulopathy
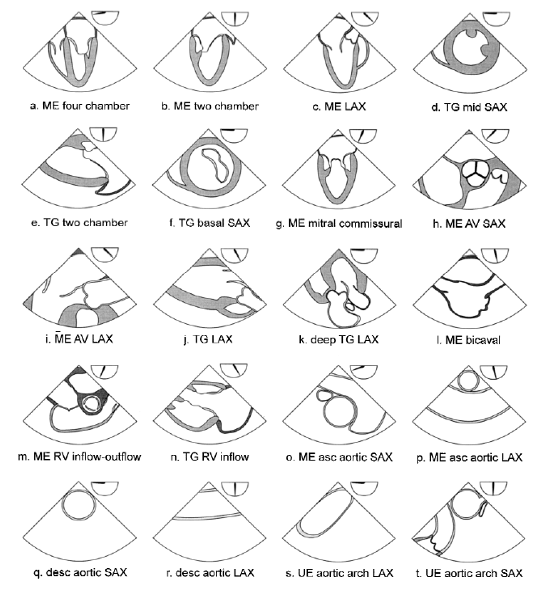
Exam Overview
Basic TEE views and their anatomy. From: Basic Perioperative Transesophageal Echocardiography Examination: A Consensus Statement of the American Society of Echocardiography and the Society of Cardiovascular Anesthesiologists (J Am Soc Echocardiogr 2013;26:443-56.) Also from Dr. Ricardo J. Benenstein: Basic TEE Protocol NYU Langone Medical Center
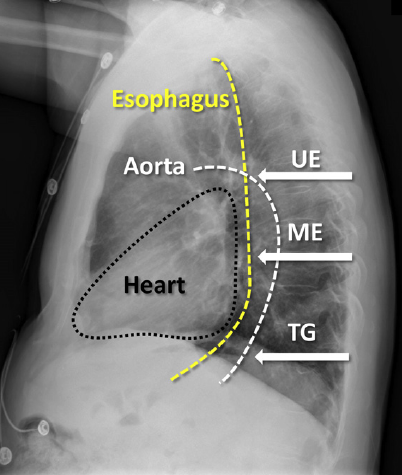
TEE Probe Angle and Depth
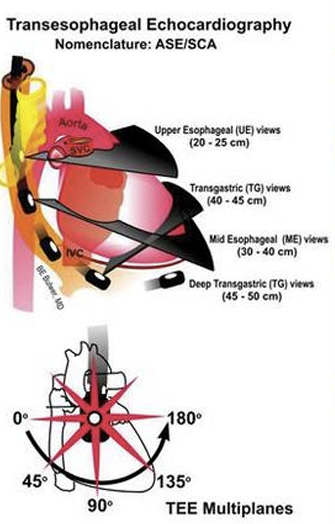
This is a great summary of angles if you have trouble visualizing them.
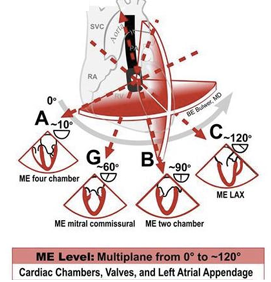
Mid Esophageal Views
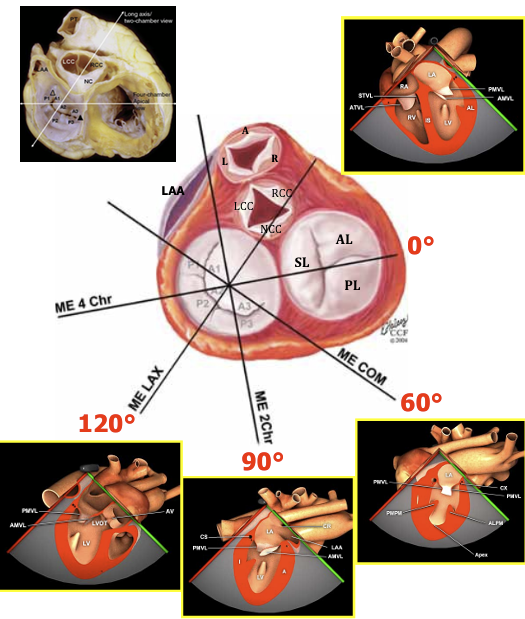
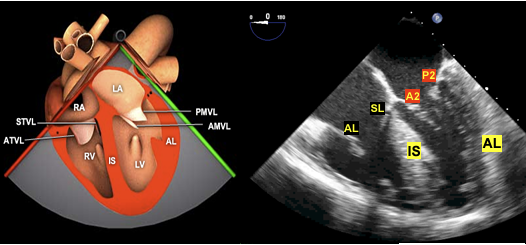
ME Four-Chamber View
The ME four-chamber view is obtained by advancing the probe to a depth of approximately 35 cm. Turning the probe to the left (counterclockwise rotation of the probe) or to the right (clockwise rotation of the probe). You may need to advance slightly to bring the true apex into view. A slight retroflexion may be required to align the MV and LV apex. This view is used to assess global function of the LV and RV, MV and TV function, and shunt flow if present. To assess valve function and shunt flow use color doppler with a Nyquist limit of 50-60cm/sec.
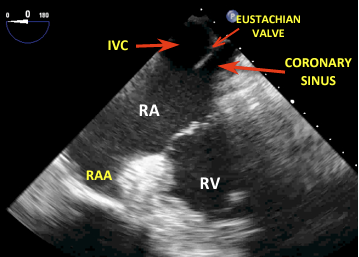
Coronary Sinus
Slightly advance the probe until you lose sight of some left sided structures and you begin to see the inferior vena cava and CS.
ME Two-Chamber 60 View
From the four chamber view rotate your angle to approx. 60 degrees to where you no longer see any right sided structures. You may need to rotate counter clockwise.
ME Two-Chamber View
From the four chamber view rotate your angle to approx. 90 degrees to where you no longer see any right sided structures. This view gives a different perspective on LV and MV function.
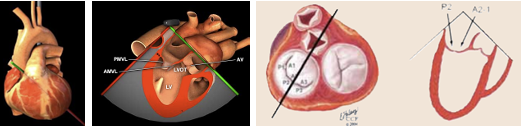
ME Long-Axis (LAX) View
From the ME two-chamber view, rotate to 110-150 until the LVOT and AV come into view. You can now examine pathology in the LVOT, AV, MV, and LV. 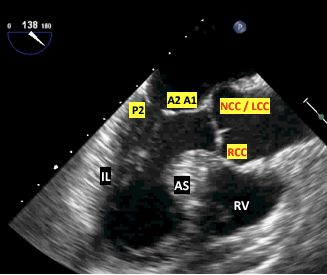
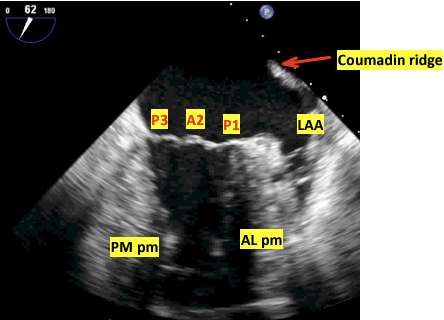
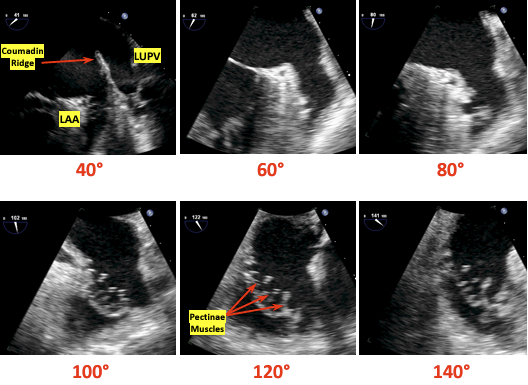
Left Atrial Appendage Views
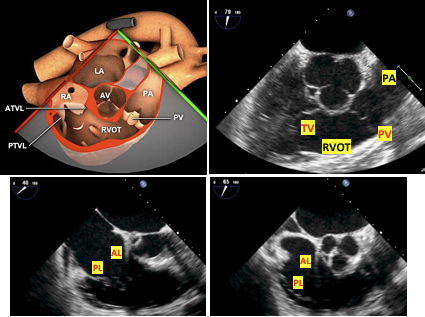
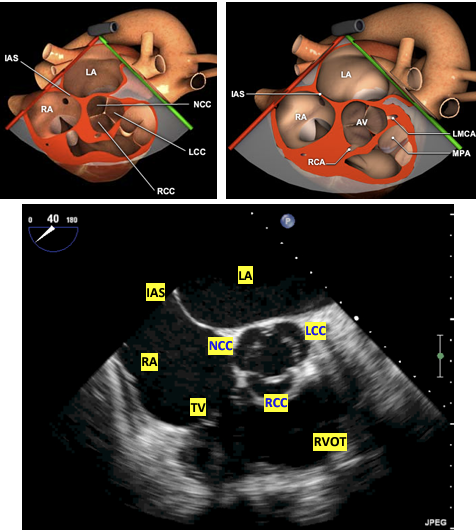
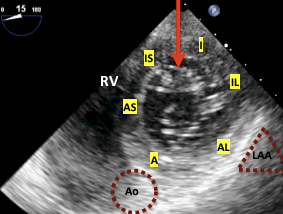
ME AV Short Axis and RV inflow outflow
This is a great anatomical and echo summary of the ME and UE views of the great vessels and superior heart structures.
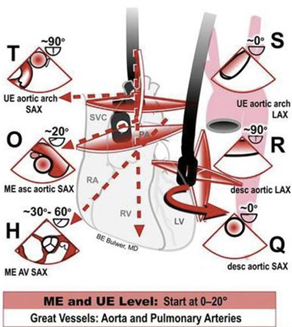
From any ME view, change your angle to 45 degrees and slowly advance or pullback until the AV comes into view. You may need to rotate clockwise. It should look similar to a Mercedes logo. To find the RV inflow outflow views adjust your angle to 60-90 and move the probe to keep the AV in view. Change the probe depth or rotation to focus on the TV or PV. Utilize color doppler for valve analysis.
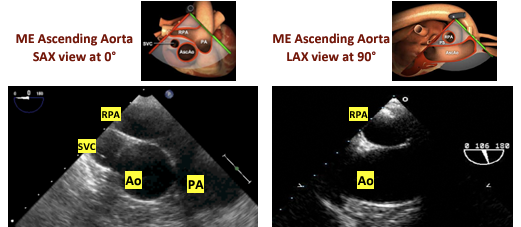
ME Ascending Aortic SAX View
Withdraw the probe slightly and change the angle to 0-20. This should bring the main PA and bifurcation into view. The right PA will be on top.
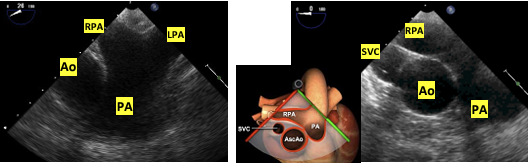
ME Ascending Aortic LAX View
From the ME Aortic SAX change the angle to 90. You can also withdraw the probe from the ME LAX viewto see the LAX of the ascending aorta. This can count as an UE view due to withdrawing the probe.
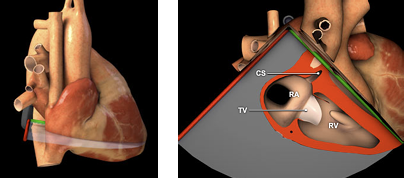
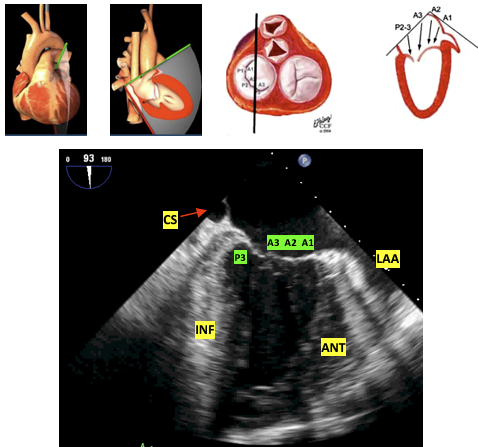
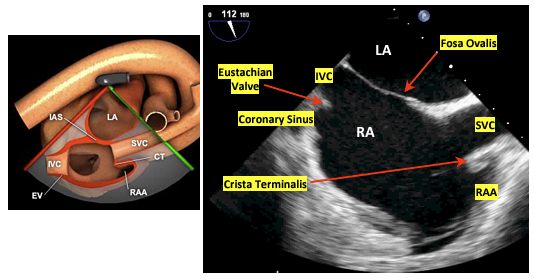
ME Bicaval View
From the ME RV inflow-outflow view rotate 90-110 and slightly clockwise. The RA and vena cavas should be in view. This is particularly helpful when placing venous access wires or ECMO/CBP cannulas.
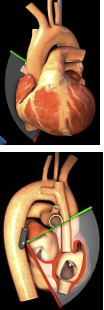
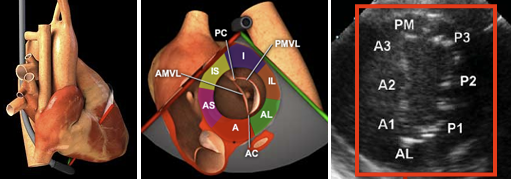
The first image orients you with body while the following image is more detailed with the structures visualized.
Transgastric Views TG
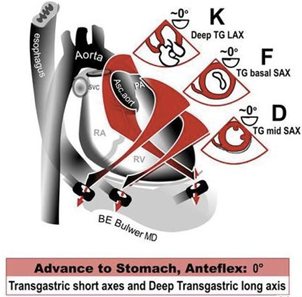
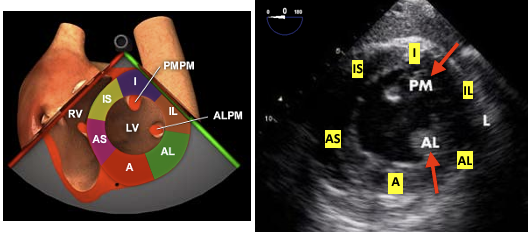
TG Midpapillary SAX View
From the ME four-chamber view advance into the stomach and anteflexed to come in contact with the gastric wall. Slowly advance until you can see both papillary muscles. Visualization of the MV leaflet chords indicates that the probe should be advanced, whereas not visualizing any papillary muscles indicates that the probe is too deep. Once the posteromedial papillary muscle is in view, visualization of the anterolateral papillary muscle is optimized by varying the degree of anteflexion. If MV leaflet chords are seen, anteflexion should be decreased, whereas not visualizing any papillary muscles indicates that anteflexion should be increased. This view is very popular for intraoperative monitoring.
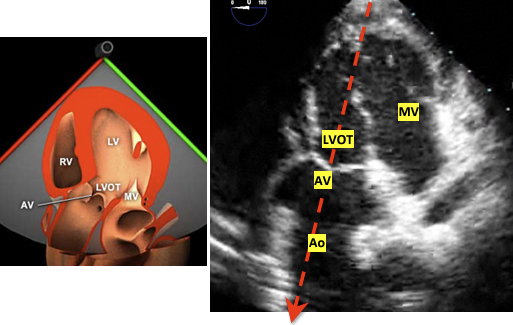
TG Deep LAX View
This view is used for aortic valve measurments due to the LVOT and AV being lined up with probe. The cosine of the doppler angle is still a factor but significantly diminished as oppposed to the ME 120 degree view.
TG Basal View
This view is used in MV analysis specifically planimetry for the area of the MV opening among others.
Descending Aortic SAX and LAX Views
This selection of views is helpful in aneurysms and dissections. It is also quite useful when placing intra-aortic balloon pumps and arterial cannulas for ECMO or CPB. Rotate teh probe couterclockwise from the ME Four Chamber view to locate the aorta and then advance for more descending or withdrawn for arch and ascending views. Use the X-Plane mode for 90 degree view or just move your angle to 90 as needed.

End of Exam
Make sure to unlock the probe and withdraw it slowly. Check the probe for signs of bleeding.
Additional Surgical TEE Considerations
From the pdf:
Intraoperative transesophageal echocardiography (TEE) is a standard diagnostic and monitoring tool employed in the management of patients undergoing an entire spectrum of cardiac surgical procedures, ranging from surgical coronary revascularization to complex valve repair, combined procedures, and organ transplantation.1 The operating room is a dynamic environment with unique challenges. Combinations of echocardiographic modalities, including twodimensional (2D), three-dimensional (3D), color flow and/or spectral Doppler, and cardiac mechanics, are used to (1) confirm the preoperative diagnosis, (2) evaluate interval changes, (3) guide surgical interventions and hemodynamic management, (4) assess results of the surgical procedure, and (5) diagnose the etiology of hemodynamic disturbances. Hemodynamic fluctuations, electrical pacing, positive pressure ventilation, fluid shifts, and surgical maneuvers can impact echocardiographic evaluation. Frequently, despite interruptions and stressors, decisions may have to bemade urgently depending on patient and surgical factors. While a complete echocardiographic evaluation is always recommended and desirable, it may not always be possible due to the urgency of the procedure, competing clinical tasks, or surgical maneuvers